Create a Classic Chignon: An Elegant Updo Tutorial for Timeless Bridal & Formal Styling
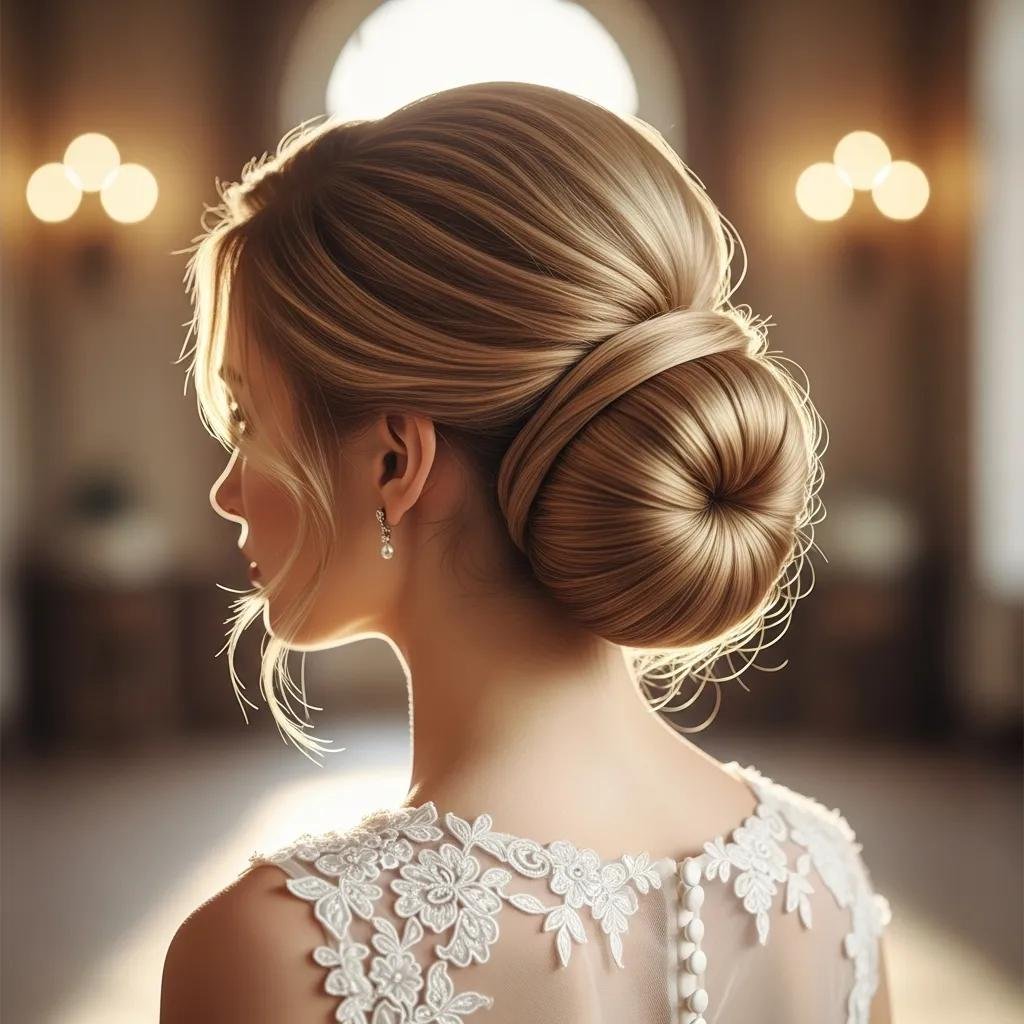
The classic chignon is a low, refined bun at the nape that creates a clean, photographed-ready silhouette for brides and formal occasions. This elegant updo tutorial explains why the chignon remains a top choice for special events, which tools and prep steps make it last, and a clear, step-by-step low chignon tutorial you can follow at home. Whether you’re trying a DIY approach or deciding when to book a pro for a photo-perfect wedding updo in Bethesda, this guide offers product-agnostic prep tips, a compact supplies checklist, five precise styling steps with timing, and Ruth’s pro longevity techniques—Ruth leads Kylie Studio Salon’s special occasion work in Bethesda, MD. Keywords like elegant updo tutorial, classic chignon, wedding updo Bethesda, and low chignon tutorial are woven naturally so you can find what you need quickly.
Why Choose a Classic Chignon for Your Elegant Updo?
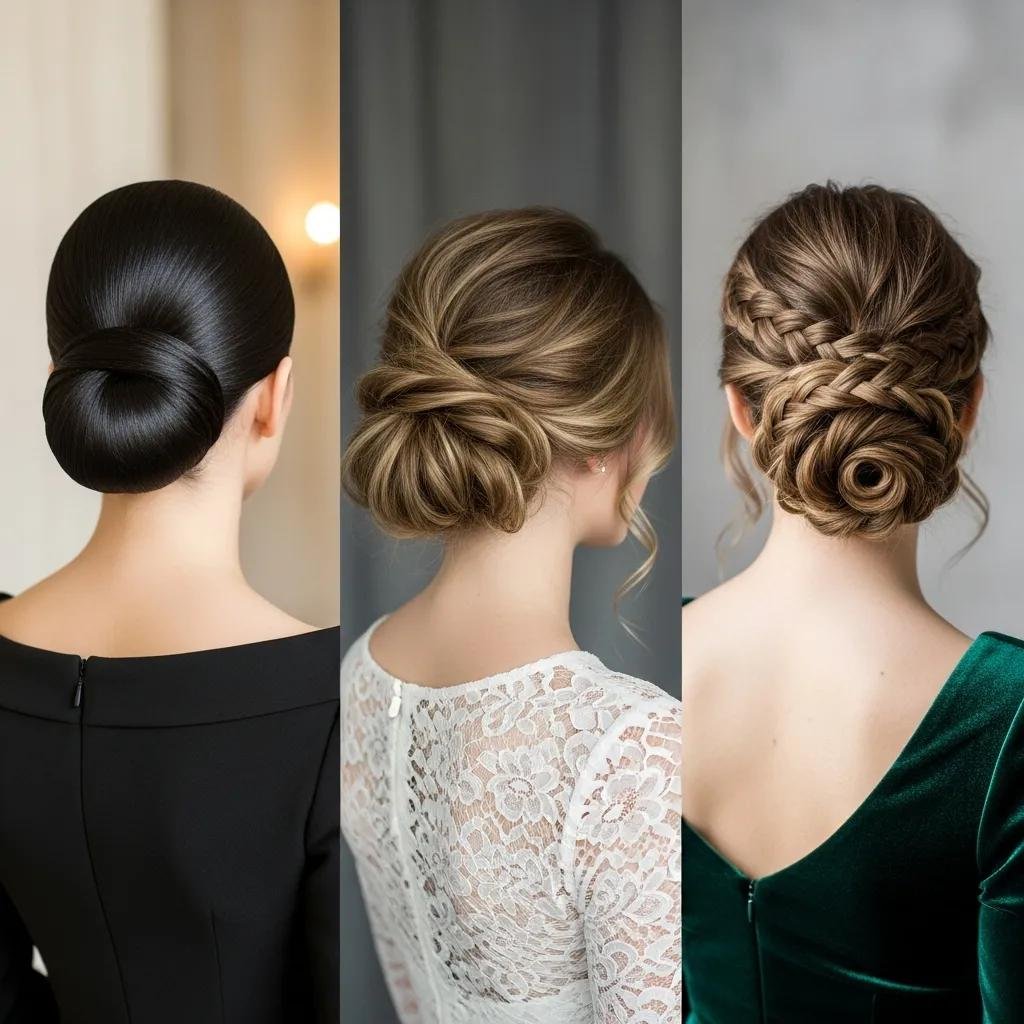
The classic chignon balances clean simplicity with reliable structure, creating a polished look that photographs beautifully and pairs effortlessly with veils or statement jewelry. The technique—anchoring hair into a low pony, twisting or rolling the lengths, then securing with pins—builds a compact silhouette that resists wind and movement, giving you both elegance and endurance. Benefits include a timeless finish, adaptability to different hair densities, and plenty of room to add accessories without crowding the style. Below is a quick comparison of chignon variations to help you pick the right direction for your event.
Those options show how one updo family—the chignon—can be tailored to match your dress, accessories, and event tone. Next, we’ll cover the practical prep and tools that make each version hold up through photos and dancing.
Practically speaking, the chignon’s low, photo‑friendly profile and accessory-friendly placement make it a go-to for wedding hair and formal portraits. The next section breaks down visual characteristics and how variations suit different hair types and necklines.
What Makes the Classic Chignon a Timeless and Versatile Hairstyle?
The chignon reads as timeless because it highlights a clean neck line and a compact bun that feels at home in both classic and contemporary looks. Its low placement leaves room for veils, combs, and decorative pins to be anchored without crowding the crown. Whether you prefer sleek, softly romantic, or braided variations, a chignon lets your stylist match the hairstyle to your gown and personal style. That versatility is why photographers and stylists often recommend the chignon for looks that must stay elegant across lighting and angles.
That adaptability leads naturally into which occasions favor a chignon and how to choose the right variation for your event.
Which Special Occasions Suit the Classic Chignon Best?
The classic chignon is ideal for events that need a composed, long‑wearing hairstyle where photos and movement are expected. Weddings—whether for the bride, bridesmaids, or mothers—are a prime fit because the chignon integrates well with veils, tiaras, and formal gowns while staying secure through ceremony and reception. Black‑tie galas benefit from the chignon’s clean lines that highlight necklines and jewelry. Proms and milestone celebrations also favor chignons when you want an elegant, mature look without the bulk of a high updo.
- Brides often choose a low chignon for its timeless, photo‑ready profile.
- Guests at black‑tie events pick sleek chignons to emphasize necklines and accessories.
- Bridesmaids and mothers select variations that coordinate with the bride while staying comfortable all day.
Next up: the tools and preparation that help your chignon hold and look refined from start to finish.
What Essential Tools and Preparation Are Needed for a Classic Chignon?
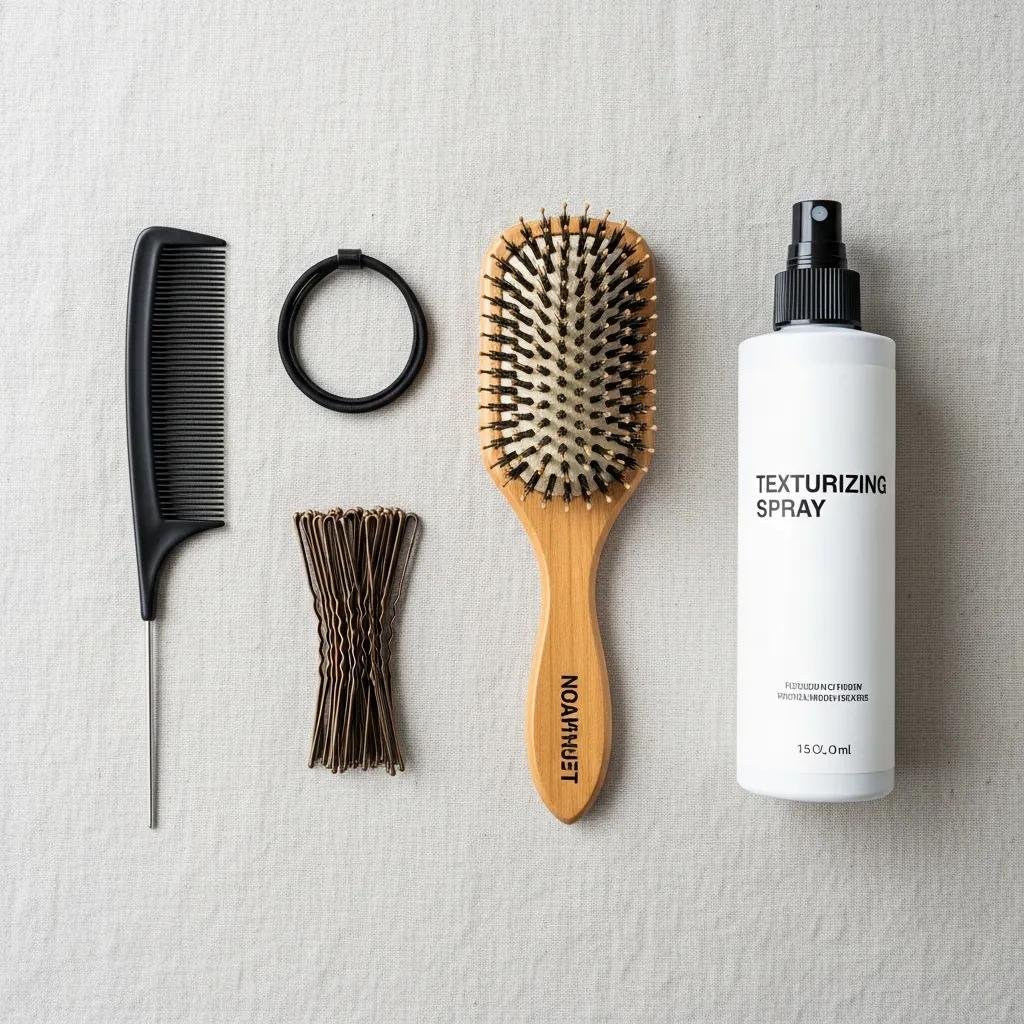
A lasting chignon starts with the right tools, a few targeted products, and a short pre‑styling routine to add grip and shape. Essentials include bobby pins, a sturdy elastic, a tail comb for sectioning, a brush to smooth, and a texturizing spray for hold; finishing touches like a smoothing serum or light hairspray keep the look polished. The table below explains each item and how we use it for a formal bun. After that, you’ll find a quick prep checklist to run through before styling.
This quick reference shows what’s essential for a formal bun and helps you pack a focused kit without unnecessary products.
Before you begin, run through this simple prep checklist so the chignon shapes easily and holds all day:
- Detangle and dry so hair has natural movement.
- Apply texturizer to mid‑lengths and ends for grip.
- Smooth roots with a light serum if you want a sleek finish.
With those steps done, you’ll have the texture and control needed for pin retention. The next subsection covers tool choices and placement tips in more detail.
Which Hair Styling Tools Are Required for Creating a Formal Bun?
Choose tools that support structure and discrete anchoring. Bobby pins are your main fastener—pick sizes that suit your density and place them vertically with a cross‑grip to lock sections. A strong elastic forms a reliable pony base—one that grips without creating a bulky knot. Use a tail comb for precise sectioning and a medium‑bristle brush to smooth or add gentle volume. If your hair is fine or you want extra texture, a light texturizing spray on the mid‑lengths gives pins something to hold onto without stiffening the roots.
Pro tip: keep a handful of spare pins in a magnetized dish while you work so you can quickly secure any stray pieces. Next, we’ll look at how to prepare hair before styling a formal updo.
How Should You Prepare Your Hair Before Styling an Elegant Updo?
Start with hair that isn’t stripped of natural oils—one‑day hair usually holds styles better—so consider washing the night before or using dry shampoo if roots are oily. Thoroughly detangle, then add a small amount of smoothing serum for sleek variations or a texturizing spray for looser, textured chignons. Sectioning the hair into zones (crown, sides, back) before creating the ponytail helps control volume and distribute tension evenly. For fine hair, light backcombing at the crown and mid‑lengths adds grip; for thick hair, use multiple smaller elastics or a wrapped base to reduce bulk in the finished bun.
Those prep choices set you up for the step‑by‑step guide where the base ponytail and twisting technique turn prep into a finished chignon.
How to Create a Classic Chignon: Step-by-Step Elegant Updo Guide
The classic chignon comes together in five focused steps: prepare, make the base ponytail, twist the hair, secure the bun with pins, then refine and finish. Each step uses structural principles—anchoring, even tension, layered pins—to create a compact, durable bun that reads as an elegant updo. Below is a numbered how‑to with estimated timing so you can plan the process for a photo‑ready result.
- Prepare the hair (5–10 minutes): Detangle, add texturizer to mid‑lengths, and section hair into manageable parts.
- Create a low ponytail base (2–4 minutes): Gather hair at the nape and secure with a non‑bulky elastic where you want the bun to sit.
- Twist or roll the ponytail (3–6 minutes): Smooth and twist the length toward the elastic, keeping steady tension to shape the bun.
- Form and pin the chignon (5–8 minutes): Wrap the twist into a bun, insert bobby pins using an anchor‑cross pattern, and build the shape.
- Refine and finish (2–4 minutes): Tuck loose ends, add accessories, and mist lightly with hairspray for hold.
These timings give you a realistic sense of how long a chignon takes and where to pause for adjustments. The following H3 sections break each step down with texture‑specific notes.
Step 1: How to Prepare Your Hair for the Chignon?
Begin by detangling and adding a texturizing product to mid‑lengths and ends to improve pin retention. For a sleek chignon, smooth a small amount of serum at the roots and brush for a polished surface before gathering the hair. Section into crown, sides, and back to control volume and shape the bun evenly. For fine hair, lightly backcomb at the mid‑shaft for extra body; for thick hair, keep initial ponytail tension a little looser to prevent an overly dense final bun.
Good preparation reduces corrective pinning and speeds up the process, leading naturally into forming a secure low ponytail.
Step 2: How to Create a Low Ponytail as the Base?
Place the ponytail at the nape—centered for a classic profile or slightly off‑center for a modern slant. Use a low‑stretch elastic and secure the ponytail snugly without creating a noticeable bump; for very thick hair, wrap the elastic twice and smooth the surface. Before fully tightening, lift at the roots where you want volume, then smooth the top section for a clean finish. The ponytail’s tension is your anchor, so aim for firm hold that’s comfortable.
With a stable base, the twist converts the length into the chignon’s body, which we cover next.
Step 3: What Is the Classic Twist Technique for the Bun?
Twist the ponytail in one direction and coil it toward the elastic, keeping tension even so the bun forms smoothly—tight enough to hold, not so tight it kinks. For added interest, weave a small braid or rope twist into one side before wrapping. Anchor the twist where it meets the elastic with a short row of pins, then add cross‑grip pins toward the scalp to lock the coil. Distribute pins around the base to keep balance and avoid bunching them in a single spot.
This twist method sets you up for the pinning phase where structure and final shape are reinforced.
Step 4: How to Form and Secure the Chignon Bun?
After coiling, insert bobby pins at opposing angles in a crisscross pattern to create an “X” lock—this converts lateral movement into secure tension. Use longer pins for thicker sections and shorter pins where visibility or comfort is a concern. Check balance visually and add a few discreet pins under the bun and at the sides so the silhouette stays intact while turning and dancing. Tuck short pieces into the coil and finish with a light spray before placing accessories.
With the bun secure, small refinements—softening edges, adding pins or florals—complete the look and prepare it to last.
Step 5: How to Refine and Finish Your Elegant Updo?
Smooth flyaways with a light serum or touch‑up spray and place decorative pins or combs where they will both enhance and help anchor the style. For a modern, soft effect, gently pull a few face‑framing tendrils and soften the crown. Finish with a medium‑hold hairspray from arm’s length to avoid stiffness while protecting against humidity. For on‑the‑day fixes, bring spare bobby pins and a travel‑size hairspray for last‑minute photo touch‑ups.
These final touches keep the chignon polished and camera‑ready. Next we share Ruth’s top pro tips for longer‑lasting updos.
What Pro Tips Does Kylie Studio Salon’s Ruth Offer for Lasting Updos?
Ruth—owner and stylist at Kylie Studio Salon—says longevity starts with structure: build secure anchors first, then finish with product sparingly. She recommends using two pin lengths (long for base anchors, short for surface securing) and inserting pins against the hair’s fall to lock sections. Tailor product amounts and tension to hair type: light product and medium tension for fine hair; stronger anchors and texturizer for thick hair. Below are Ruth’s actionable tips you can apply during styling.
- Place pins vertically and use cross‑grip anchors to prevent slipping.
- Pair a texturizer for grip with a touch of smoothing serum on the surface to balance hold and shine.
- Pack spare pins and a small hairspray in your bag for quick event‑day fixes.
How to Enhance Style Longevity and Adapt to Different Hair Types?
For fine hair: boost surface grip with a light texturizing mist, use less smoothing serum at the roots, and add a padded base or small donut if you need bulk. For medium hair: aim for balanced ponytail tension and two to three anchor pins around the base. For thick hair: split the ponytail into two coils or wrap in sections to reduce bulk, and use longer pins for structural support. Ruth also recommends a rehearsal run for high‑stakes events like weddings so you can fine‑tune product mix and the pin map ahead of time.
These adjustments will help you decide when a pro appointment is worth the investment—the next section covers that decision.
When Should You Consider Professional Updo Services in Bethesda, MD?
Book a professional when your style needs to last all day and night, when veils or accessories require precise integration, or when you want a trial run so the look photographs exactly as planned. Professionals bring practiced pin mapping, experience with varied hair textures, and the ability to make on‑the‑spot adjustments that reduce stress on event day. Kylie Studio Salon offers special occasion styling focused on personalized consultation and confidence‑building results—especially helpful for milestone events. If you’re coordinating multiple looks or pairing hair with makeup and veil placement, a salon booking gives you a smoother, photo‑ready outcome.
Next: how to book a trial or appointment at Kylie Studio Salon and what to expect when you arrive.
How to Book Your Elegant Chignon and Special Occasion Updo at Kylie Studio Salon?
Booking starts by choosing the right special occasion styling option and deciding if you want a trial before the event. During booking expect a consultative conversation where your stylist discusses hairstyle goals, accessory needs, and suggested timing for trials and day‑of services. Kylie Studio Salon serves the Bethesda area and Ruth leads the salon’s special occasion work with tailored service. The table below outlines common offerings and recommended booking windows so you can plan with confidence.
What Special Occasion Hairstyles and Updo Services Are Offered Locally?
Local salons typically offer special occasion styling, bridal hair, gala updos, and proms—Kylie Studio Salon highlights custom special occasion styling and updos in its offerings. Services usually include a consult about your desired look, accessory placement, and hair prep suggestions so the style photographs well and lasts all day. When choosing a salon, review portfolios and plan a trial if your event calls for a precise, custom result. Our focus is always on enhancing natural beauty and confidence for your big day in the Bethesda area.
How to Schedule Your Appointment for Bridal Hair and Formal Styling?
Decide whether you want a trial, then reserve both trial and day‑of styling with enough lead time: brides should secure trials and day‑of slots as early as possible within their wedding timeline. For proms and parties, booking two to six weeks ahead usually works; for weddings, aim for a trial one to three months before and confirm the day‑of timing early. Bring inspiration photos, any accessories you’ll wear, and let us know about recent color or cuts so we can tailor the plan. For directions and booking, contact Kylie Studio Salon by phone or visit to speak with Ruth about your special occasion styling.
This guide covers tools, techniques, and booking notes to help you create or arrange a classic chignon that’s elegant, durable, and suited to your event.
Frequently Asked Questions
1. What hair types are best suited for a classic chignon?
The classic chignon is highly adaptable. Fine hair benefits from texturizing products to add grip and body. Medium hair usually needs balanced tension and a few anchor pins for stability. Thick hair can be managed by dividing the ponytail or wrapping in sections to reduce bulk. The key is adjusting prep and pinning to your hair’s texture.
2. How can I make my chignon last throughout the day?
Start with proper prep: add texturizer for grip and use smoothing serum where you want shine. Secure the bun with bobby pins in a crisscross pattern and finish with a medium‑hold hairspray to protect from humidity and movement. Carry spare pins and a travel hairspray for quick touch‑ups between photos.
3. Can I add accessories to my classic chignon?
Absolutely. The low placement makes it easy to add veils, decorative pins, or floral accents without overwhelming the style. Secure accessories so they help anchor the bun while complementing your outfit. Bringing accessories to your trial helps the stylist place them naturally.
4. What are some common mistakes to avoid when styling a chignon?
Common missteps include using too much product—this can weigh hair down—and not securing the ponytail tightly enough, which can cause slipping. Avoid crowding one area with pins; instead distribute anchors evenly and use different pin lengths for balance. Practicing ahead of time reduces surprises on the day.
5. How do I choose the right variation of chignon for my event?
Match the chignon to your event’s formality and your personal style. A low, sleek chignon suits weddings and formal galas. A messy chignon fits relaxed or boho events. A braided chignon adds romantic detail for brides or attendants. Consider your dress, accessories, and the event vibe when choosing.
6. When is it advisable to seek professional help for a chignon?
Seek a professional when the style must last all day—especially for weddings—or when accessories and veils need precise integration. Pros can ensure the look photographs well and provide a trial so you know exactly how the style will translate on the day.
7. What should I bring to my appointment for a chignon styling?
Bring inspiration photos, any accessories you’ll wear (veils, combs, pins), and details about recent hair treatments or cuts. This helps your stylist tailor the look and recommend the best prep before your appointment.
Conclusion
The classic chignon delivers timeless elegance for any formal occasion and photographs beautifully when built with the right tools and technique. Whether you try this low chignon tutorial at home or book a professional wedding updo in Bethesda, careful prep and smart pinning will keep your style polished all day. Consider a consultation or trial at Kylie Studio Salon so Ruth and our team can customize the look and ensure every detail is camera‑ready. Explore our services to elevate your special occasion styling.


